回顾
之前我们学习了spring-security的认证过程,具体可以看这里这里
这次,我们来学习下security的授权过程。
分析
和之前一样,我们先回忆下security的过滤器,因为security的认证授权都是基于过滤器机制的,security所有拦截器。
其中比较关键的一个拦截器FilterSecurityInterceptor,是作为控制用户授权的核心过滤器。具体流程图请看下图:
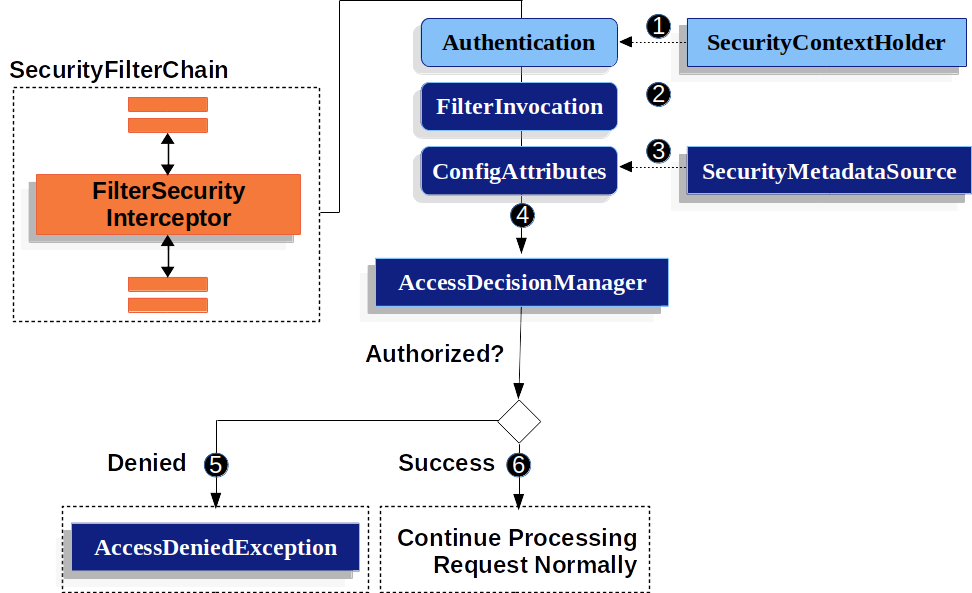
FilterSecurityInterceptor从SecurityContextHolder中获取Authentication对象- 根据
HttpServletRequest,HttpServletRequest和FilterChain来创建一个FilterInvocation对象 - 接下来吧
FilterInvocation作为参数,从SecurityMetadataSource中获取ConfigAttribute对象 - 最后,它将
Authentication、FilterInvocation和ConfigAttribute传递给AccessDecisionManager
具体可以参考源码:
protected InterceptorStatusToken beforeInvocation(Object object) {
        Assert.notNull(object, "Object was null");
        if (!getSecureObjectClass().isAssignableFrom(object.getClass())) {
            throw new IllegalArgumentException("Security invocation attempted for object " + object.getClass().getName()
                    + " but AbstractSecurityInterceptor only configured to support secure objects of type: "
                    + getSecureObjectClass());
        }
  //这个Object对象其实就是传入的FilterInvocation
        Collection<ConfigAttribute> attributes = this.obtainSecurityMetadataSource().getAttributes(object);
        if (CollectionUtils.isEmpty(attributes)) {
            Assert.isTrue(!this.rejectPublicInvocations,
                    () -> "Secure object invocation " + object
                            + " was denied as public invocations are not allowed via this interceptor. "
                            + "This indicates a configuration error because the "
                            + "rejectPublicInvocations property is set to 'true'");
            if (this.logger.isDebugEnabled()) {
                this.logger.debug(LogMessage.format("Authorized public object %s", object));
            }
            publishEvent(new PublicInvocationEvent(object));
            return null; // no further work post-invocation
        }
        if (SecurityContextHolder.getContext().getAuthentication() == null) {
            credentialsNotFound(this.messages.getMessage("AbstractSecurityInterceptor.authenticationNotFound",
                    "An Authentication object was not found in the SecurityContext"), object, attributes);
        }
        Authentication authenticated = authenticateIfRequired();
        if (this.logger.isTraceEnabled()) {
            this.logger.trace(LogMessage.format("Authorizing %s with attributes %s", object, attributes));
        }
        // 这一步就是认证的流程
        attemptAuthorization(object, attributes, authenticated);
        if (this.logger.isDebugEnabled()) {
            this.logger.debug(LogMessage.format("Authorized %s with attributes %s", object, attributes));
        }
        if (this.publishAuthorizationSuccess) {
            publishEvent(new AuthorizedEvent(object, attributes, authenticated));
        }

        // Attempt to run as a different user
        Authentication runAs = this.runAsManager.buildRunAs(authenticated, object, attributes);
        if (runAs != null) {
            SecurityContext origCtx = SecurityContextHolder.getContext();
            SecurityContext newCtx = SecurityContextHolder.createEmptyContext();
            newCtx.setAuthentication(runAs);
            SecurityContextHolder.setContext(newCtx);

            if (this.logger.isDebugEnabled()) {
                this.logger.debug(LogMessage.format("Switched to RunAs authentication %s", runAs));
            }
            // need to revert to token.Authenticated post-invocation
            return new InterceptorStatusToken(origCtx, true, attributes, object);
        }
        this.logger.trace("Did not switch RunAs authentication since RunAsManager returned null");
        // no further work post-invocation
        return new InterceptorStatusToken(SecurityContextHolder.getContext(), false, attributes, object);

    }
//认证流程代码
    private void attemptAuthorization(Object object, Collection<ConfigAttribute> attributes,
            Authentication authenticated) {
        try {
      //决策管理器,进行决策
      //默认策略AffirmativeBased----只要有一个成功就认证成功
      //ConsensusBased----成功大于失败才认证成功
      //UnanimousBased----所有都成功才认证成功
            this.accessDecisionManager.decide(authenticated, object, attributes);
        }
        catch (AccessDeniedException ex) {
            if (this.logger.isTraceEnabled()) {
                this.logger.trace(LogMessage.format("Failed to authorize %s with attributes %s using %s", object,
                        attributes, this.accessDecisionManager));
            }
            else if (this.logger.isDebugEnabled()) {
                this.logger.debug(LogMessage.format("Failed to authorize %s with attributes %s", object, attributes));
            }
            publishEvent(new AuthorizationFailureEvent(object, attributes, authenticated, ex));
            throw ex;
        }
    }
实战
FilterSecurityInterceptor授权过程
经过上述的分析,我们基本明白security授权的一般流程。那么,我们可以实战感受下。
需求:从数据库动态读取权限信息,然后进行认证。
由上面的授权原理流程图,我们可以看出SecurityMetadataSource中获取的ConfigAttribute存储的就是与计算机安全相关的属性,换句话说就是我们需要的权限信息,所以需要重写SecurityMetadataSource类:
/**
 * @author by zhuhcong
 * @descr sms自定义的权限数据源
 * @date 2022/3/7 18:14
 */
@Slf4j
@Component
public class SmsRoleSecurityMetadataSource implements FilterInvocationSecurityMetadataSource {

    private final AntPathMatcher antPathMatcher = new AntPathMatcher();
    /**
     * 假设从数据库中加载
     */
    private final Map<String,String> urlRoleMap = new HashMap<String,String>(){{
        put("/open/**","ROLE_ANONYMOUS");
        put("/health","ROLE_ANONYMOUS");
        put("/restart","ROLE_ADMIN");
        put("/demo","ROLE_USER");
        put("/index", "ROLE_USER");
    }};

    @Override
    public Collection<ConfigAttribute> getAttributes(Object object) throws IllegalArgumentException {
        //根据 请求获取 需要的权限
        FilterInvocation filterInvocation = (FilterInvocation) object;
        String url = filterInvocation.getRequestUrl();
        log.info("【请求 url : {}】", url);
        for (Map.Entry<String, String> entry : urlRoleMap.entrySet()) {
            if (antPathMatcher.match(entry.getKey(), url)) {
                return SecurityConfig.createList(entry.getValue());
            }
        }
        return null;
    }
    /**
     * 全部权限返回admin角色
     * @return
     */
    @Override
    public Collection<ConfigAttribute> getAllConfigAttributes() {
        return SecurityConfig.createList("ADMIN");
    }

    @Override
    public boolean supports(Class<?> clazz) {
        return true;
    }
}
然后,我们可以看到访问决策管理器,决定是否能授权。这里,其实可以使用内置的几个类,但是我们这里自己实现一个加深下理解。
//自定义策略,如果url匹配就放行,不匹配就不放行
/**
 * @author by zhuhcong
 * @descr 访问决策投票,参考系统默认实现类RoleVoter
 * @date 2022/3/7 20:29
 */
public class SmsRoleBasedVoter implements AccessDecisionVoter<Object> {
    @Override
    public boolean supports(ConfigAttribute attribute) {
        return true;
    }

    @Override
    public boolean supports(Class<?> clazz) {
        return true;
    }

    @Override
    public int vote(Authentication authentication, Object object, Collection<ConfigAttribute> attributes) {
        if(authentication == null){
            return ACCESS_DENIED;
        }
        Collection<? extends GrantedAuthority> authorities = authentication.getAuthorities();
        for (ConfigAttribute attribute : attributes) {
            if(attribute.getAttribute() == null){
                continue;
            }
            if (this.supports(attribute)) {
                for (GrantedAuthority authority : authorities) {
                    if(attribute.getAttribute().equals(authority.getAuthority())){
                        return ACCESS_GRANTED;
                    }
                }
            }
        }
        return ACCESS_DENIED;
    }
}
自此,我们完成自定义部分。但是,还没有完,我们需要将这些自定义部分加入到配置中去,这样才能生效。
/**
 * 管家部分在 ++++标记的位置
 * @author zhuchong
 */
@Configuration
@EnableWebSecurity
public class SecurityConfig extends WebSecurityConfigurerAdapter {
    @Autowired
    private MyAuthenticationProvider myAuthenticationProvider;

    @Autowired
    private SmsAuthenticationProvider smsAuthenticationProvider;

    @Autowired
    private SmsRoleSecurityMetadataSource smsRoleSecurityMetadataSource;

    @Bean
    public BCryptPasswordEncoder bCryptPasswordEncoder() {
        return new BCryptPasswordEncoder();
    }

    @Bean
    public SmsLoginAuthenticationFilter smsLoginAuthenticationFilter() throws Exception{
        SmsLoginAuthenticationFilter filter = new SmsLoginAuthenticationFilter();

        //对这个filter设置AuthenticationManager,取默认的ProviderManager
        filter.setAuthenticationManager(authenticationManagerBean());
        //设置成功的处理器,由于要返回json,所以进行一些处理
        filter.setAuthenticationSuccessHandler((request, response, authentication) -> {
            //登录成功时返回给前端的数据
            Map result = new HashMap();
            result.put("success", "sms登录成功");
            response.setContentType("application/json;charset=utf-8");
            response.getWriter().write(JsonUtil.jsonToString(result));
        });
        //设置失败的处理器,由于要返回json,所以进行一些处理
        filter.setAuthenticationFailureHandler((request, response, exception) -> {
            Map result = new HashMap();

            if (exception instanceof UsernameNotFoundException) {
                result.put("fail", exception.getMessage());
            } else if (exception instanceof BadCredentialsException) {
                result.put("fail", "sms密码错误" + exception.getMessage());
            } else {
                result.put("fail", "sms其他异常");
            }
            response.setContentType("application/json;charset=utf-8");
            response.getWriter().write(JsonUtil.jsonToString(result));
        });

        return filter;
    }

    @Bean
    public MyLoginAuthenticationFilter myLoginAuthenticationFilter() throws Exception {
        MyLoginAuthenticationFilter filter = new MyLoginAuthenticationFilter();

        //对这个filter设置AuthenticationManager,取默认的
        filter.setAuthenticationManager(authenticationManagerBean());
        //设置成功的处理器,由于要返回json,所以进行一些处理
        filter.setAuthenticationSuccessHandler((request, response, authentication) -> {
            //登录成功时返回给前端的数据
            Map result = new HashMap();
            result.put("success", "登录成功");
            response.setContentType("application/json;charset=utf-8");
            response.getWriter().write(JsonUtil.jsonToString(result));
        });
        //设置失败的处理器,由于要返回json,所以进行一些处理
        filter.setAuthenticationFailureHandler((request, response, exception) -> {
            Map result = new HashMap();

            if (exception instanceof UsernameNotFoundException) {
                result.put("fail", exception.getMessage());
            } else if (exception instanceof BadCredentialsException) {
                result.put("fail", "密码错误" + exception.getMessage());
            } else {
                result.put("fail", "其他异常");
            }
            response.setContentType("application/json;charset=utf-8");
            response.getWriter().write(JsonUtil.jsonToString(result));
        });
        return filter;
    }

    @Override
    protected void configure(HttpSecurity http) throws Exception {
        //关闭跨域和csrf防护
        http.cors().and().csrf().disable();
        //对请求url进行防护
        http
//                .authorizeRequests()
//                .antMatchers("/index").hasRole("USER")
//                .antMatchers("hello").hasRole("admin")
//                .and()
                .authorizeRequests()
                //放行这些路径
                .antMatchers("/smsLogin","/verityCode","/login")
                .permitAll()
                .and()

                .authorizeRequests()
                .anyRequest().authenticated()
                //修改accessManager  ++++
                .accessDecisionManager(customizeAccessDecisionManager())
                //放入自定义的权限拦截器 ++++
                .withObjectPostProcessor(new ObjectPostProcessor<FilterSecurityInterceptor>() {

                    @Override
                    public <O extends FilterSecurityInterceptor> O postProcess(O object) {
                        object.setSecurityMetadataSource(smsRoleSecurityMetadataSource);
                        return object;
                    }
                })

                .and()
                .formLogin()
                .permitAll()

                .and()
                .logout()
                .permitAll()
                .logoutSuccessHandler((request, response, authentication) -> {
                    //登出成功时返回给前端的数据
                    Map result = new HashMap();
                    result.put("success", "注销成功");
                    response.setContentType("application/json;charset=utf-8");
                    response.getWriter().write(JsonUtil.jsonToString(result));
                })
                .deleteCookies("JSESSIONID")

                .and()
                .exceptionHandling()
                .accessDeniedHandler((request, response, exception) -> {
                    //访问拒绝时返回给前端的数据
                    Map result = new HashMap();
                    result.put("success", "无权访问,need Authorities!!");
                    response.setContentType("application/json;charset=utf-8");
                    response.getWriter().write(JsonUtil.jsonToString(result));
                })
                .authenticationEntryPoint((request, response, exception) -> {
                    //访问有权限url时进行拦截
                    Map result = new HashMap();
                    result.put("success", "需要登录!!");
                    response.setContentType("application/json;charset=utf-8");
                    response.getWriter().write(JsonUtil.jsonToString(result));
                })
                .and()
                .sessionManagement()
                .maximumSessions(1)     //最多只能一个用户登录一个账号
                .expiredSessionStrategy(event -> {
                    //session策略的返回
                    Map result = new HashMap();
                    result.put("success", "您的账号在异地登录,建议修改密码!!");
                    HttpServletResponse response = event.getResponse();
                    response.setContentType("application/json;charset=utf-8");
                    response.getWriter().write(JsonUtil.jsonToString(result));
                });
        //把filter添加到UsernamePasswordAuthenticationFilter这个过滤器位置
        http.addFilterAt(myLoginAuthenticationFilter(), UsernamePasswordAuthenticationFilter.class)
                .addFilterAfter(smsLoginAuthenticationFilter(), UsernamePasswordAuthenticationFilter.class);

        //把自定义的AuthenticationProvider设置进去
        http.authenticationProvider(myAuthenticationProvider)
                .authenticationProvider(smsAuthenticationProvider);
    }

      //++++
    private AccessDecisionManager customizeAccessDecisionManager() {

        List<AccessDecisionVoter<? extends Object>> decisionVoterList
                = Arrays.asList(
                new SmsRoleBasedVoter()
        );
        return new AffirmativeBased(decisionVoterList);
    }
}
全部完成之后,就可以启动程序进行验证,具体验证流程可以参考认证篇。
AuthorizationFilter授权过程(Spring推荐)
我们可以看出上面的流程有点复杂,spring官方并不推荐这种方式。新的流程更加简洁易用,具体如下
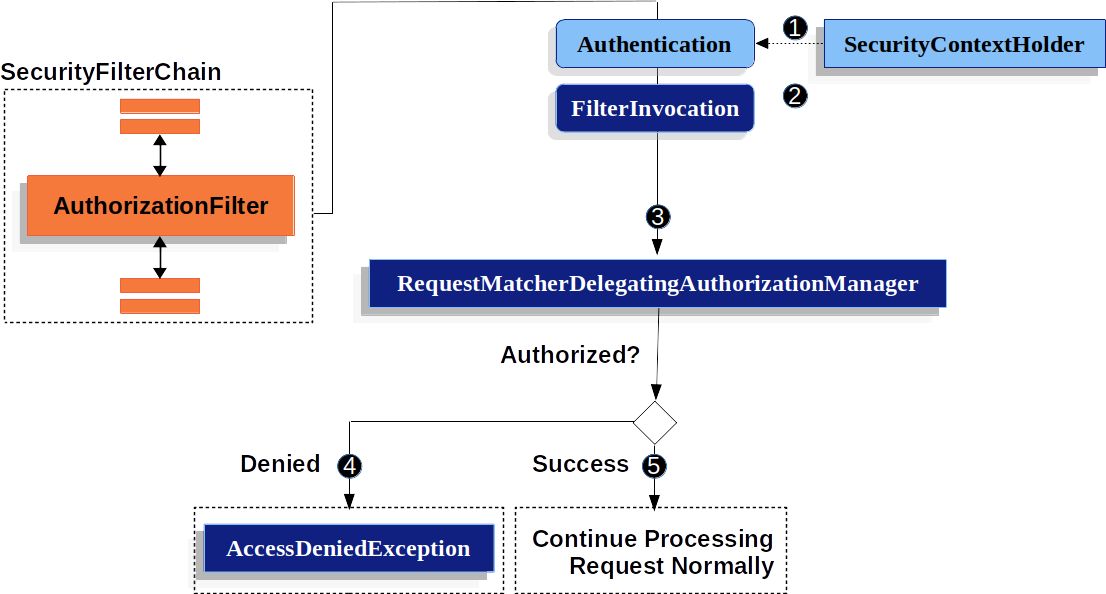
可以看出,关键在于第三部的校验,比之前的简洁很多,具体源码可以看这里:
    public AuthorizationDecision check(Supplier<Authentication> authentication, HttpServletRequest request) {
        if (this.logger.isTraceEnabled()) {
            this.logger.trace(LogMessage.format("Authorizing %s", request));
        }
    //    遍历需要授权的的url,我们配置放行的url也回出现在这个map中
        for (Map.Entry<RequestMatcher, AuthorizationManager<RequestAuthorizationContext>> mapping : this.mappings
                .entrySet()) {

            RequestMatcher matcher = mapping.getKey();
            MatchResult matchResult = matcher.matcher(request);
            if (matchResult.isMatch()) {
                AuthorizationManager<RequestAuthorizationContext> manager = mapping.getValue();
                if (this.logger.isTraceEnabled()) {
                    this.logger.trace(LogMessage.format("Checking authorization on %s using %s", request, manager));
                }
        //如果,不是白名单中的url,AuthorizationManager进行一个处理
        //默认的实现类是AuthenticatedAuthorizationManager,它是只要认证通过就会放行,默认显然不满足我们的需求
        //显而易见,我们需要自定义的地方就在这
                return manager.check(authentication,
                        new RequestAuthorizationContext(request, matchResult.getVariables()));
            }
        }
        this.logger.trace("Abstaining since did not find matching RequestMatcher");
        return null;
    }
其实,逻辑很简单,只需要跟着断点走一遍,即可。
下面来进行一个实战,代码如下:
@Component
public final class SmsAuthorizationFilterManager implements AuthorizationManager<RequestAuthorizationContext> {

    private final AntPathMatcher antPathMatcher = new AntPathMatcher();

    /**
     * 假设从数据库中加载
     */
    private final Map<String,String> urlRoleMap = new HashMap<String,String>(){{
        put("/open/**","ROLE_ANONYMOUS");
        put("/health","ROLE_ANONYMOUS");
        put("/restart","ROLE_ADMIN");
        put("/demo","ROLE_USER");
        put("/index", "ROLE_USER");
    }};


    @Override
    public AuthorizationDecision check(Supplier<Authentication> authentication, RequestAuthorizationContext object) {
        HttpServletRequest request = object.getRequest();
                //空信息直接返回授权失败
        if(authentication.get() == null){
            return new AuthorizationDecision(false);
        }

        Collection<? extends GrantedAuthority> authorities = authentication.get().getAuthorities();
                //没有角色信息直接回回授权失败
        if(authorities==null || authorities.size()==0){
            return new AuthorizationDecision(false);
        }
                //这一步就是每次比对,看有没有url匹配,如果有返回授权成功,否者失败
        for(GrantedAuthority grantedAuthority : authorities){
            String authority = grantedAuthority.getAuthority();
            String role = urlRoleMap.get(request.getRequestURI());
            boolean match = antPathMatcher.match(authority, role);
            if(match){
                return new AuthorizationDecision(true);
            }
        }
        return new AuthorizationDecision(false);

    }


    @Override
    public void verify(Supplier<Authentication> authentication, RequestAuthorizationContext object) {
        AuthorizationManager.super.verify(authentication, object);
    }

}
接下来,还是配置类把这个类加载到配置中去。
@Configuration
@EnableWebSecurity
public class SecurityConfig extends WebSecurityConfigurerAdapter {
    @Autowired
    private MyAuthenticationProvider myAuthenticationProvider;

    @Autowired
    private SmsAuthenticationProvider smsAuthenticationProvider;

    @Autowired
    private SmsRoleSecurityMetadataSource smsRoleSecurityMetadataSource;

    @Autowired
    private SmsAuthorizationFilterManager smsAuthorizationFilterManager;

    @Bean
    public BCryptPasswordEncoder bCryptPasswordEncoder() {
        return new BCryptPasswordEncoder();
    }

    @Bean
    public SmsLoginAuthenticationFilter smsLoginAuthenticationFilter() throws Exception{
        SmsLoginAuthenticationFilter filter = new SmsLoginAuthenticationFilter();

        //对这个filter设置AuthenticationManager,取默认的ProviderManager
        filter.setAuthenticationManager(authenticationManagerBean());
        //设置成功的处理器,由于要返回json,所以进行一些处理
        filter.setAuthenticationSuccessHandler((request, response, authentication) -> {
            //登录成功时返回给前端的数据
            Map result = new HashMap();
            result.put("success", "sms登录成功");
            response.setContentType("application/json;charset=utf-8");
            response.getWriter().write(JsonUtil.jsonToString(result));
        });
        //设置失败的处理器,由于要返回json,所以进行一些处理
        filter.setAuthenticationFailureHandler((request, response, exception) -> {
            Map result = new HashMap();

            if (exception instanceof UsernameNotFoundException) {
                result.put("fail", exception.getMessage());
            } else if (exception instanceof BadCredentialsException) {
                result.put("fail", "sms密码错误" + exception.getMessage());
            } else {
                result.put("fail", "sms其他异常");
            }
            response.setContentType("application/json;charset=utf-8");
            response.getWriter().write(JsonUtil.jsonToString(result));
        });

        return filter;
    }

    @Bean
    public MyLoginAuthenticationFilter myLoginAuthenticationFilter() throws Exception {
        MyLoginAuthenticationFilter filter = new MyLoginAuthenticationFilter();

        //对这个filter设置AuthenticationManager,取默认的
        filter.setAuthenticationManager(authenticationManagerBean());
        //设置成功的处理器,由于要返回json,所以进行一些处理
        filter.setAuthenticationSuccessHandler((request, response, authentication) -> {
            //登录成功时返回给前端的数据
            Map result = new HashMap();
            result.put("success", "登录成功");
            response.setContentType("application/json;charset=utf-8");
            response.getWriter().write(JsonUtil.jsonToString(result));
        });
        //设置失败的处理器,由于要返回json,所以进行一些处理
        filter.setAuthenticationFailureHandler((request, response, exception) -> {
            Map result = new HashMap();

            if (exception instanceof UsernameNotFoundException) {
                result.put("fail", exception.getMessage());
            } else if (exception instanceof BadCredentialsException) {
                result.put("fail", "密码错误" + exception.getMessage());
            } else {
                result.put("fail", "其他异常");
            }
            response.setContentType("application/json;charset=utf-8");
            response.getWriter().write(JsonUtil.jsonToString(result));
        });
        return filter;
    }

    @Override
    protected void configure(HttpSecurity http) throws Exception {
        //关闭跨域和csrf防护
        http.cors().and().csrf().disable();
        //对请求url进行防护
        http
          //主要这块改动
                .authorizeHttpRequests(auth->auth.mvcMatchers("/smsLogin","/verityCode","/login","logout")
                        .permitAll()
                                       //通过access把我们刚才定义的Manager设置进去
                        .anyRequest().access(smsAuthorizationFilterManager)

                )
//                .authorizeRequests()
//                .antMatchers("/index").hasRole("USER")
//                .antMatchers("hello").hasRole("admin")
//                .and()
//                .authorizeRequests()
//                //放行这些路径
//                .antMatchers("/smsLogin","/verityCode","/login")
//                .permitAll()
//                .and()
//
//                .authorizeRequests()
//                .anyRequest().authenticated()
//                //修改accessManager
//                .accessDecisionManager(customizeAccessDecisionManager())
//                //放入自定义的权限拦截器
//                .withObjectPostProcessor(new ObjectPostProcessor<FilterSecurityInterceptor>() {
//
//                    @Override
//                    public <O extends FilterSecurityInterceptor> O postProcess(O object) {
//                        object.setSecurityMetadataSource(smsRoleSecurityMetadataSource);
//                        return object;
//                    }
//                })
//
//                .and()
                .formLogin()
                .disable()


                .logout()
//                .permitAll()
                .logoutSuccessHandler((request, response, authentication) -> {
                    //登出成功时返回给前端的数据
                    Map result = new HashMap();
                    result.put("success", "注销成功");
                    response.setContentType("application/json;charset=utf-8");
                    response.getWriter().write(JsonUtil.jsonToString(result));
                })
                .deleteCookies("JSESSIONID")

                .and()
                .exceptionHandling()
                .accessDeniedHandler((request, response, exception) -> {
                    //访问拒绝时返回给前端的数据
                    Map result = new HashMap();
                    result.put("success", "无权访问,need Authorities!!");
                    response.setContentType("application/json;charset=utf-8");
                    response.getWriter().write(JsonUtil.jsonToString(result));
                })
                .authenticationEntryPoint((request, response, exception) -> {
                    //访问有权限url时进行拦截
                    Map result = new HashMap();
                    result.put("success", "需要登录!!");
                    response.setContentType("application/json;charset=utf-8");
                    response.getWriter().write(JsonUtil.jsonToString(result));
                })
                .and()
                .sessionManagement()
                .maximumSessions(1)     //最多只能一个用户登录一个账号
                .expiredSessionStrategy(event -> {
                    //session策略的返回
                    Map result = new HashMap();
                    result.put("success", "您的账号在异地登录,建议修改密码!!");
                    HttpServletResponse response = event.getResponse();
                    response.setContentType("application/json;charset=utf-8");
                    response.getWriter().write(JsonUtil.jsonToString(result));
                });
        //把filter添加到UsernamePasswordAuthenticationFilter这个过滤器位置
        http.addFilterAt(myLoginAuthenticationFilter(), UsernamePasswordAuthenticationFilter.class)
                .addFilterAfter(smsLoginAuthenticationFilter(), UsernamePasswordAuthenticationFilter.class);

        //把自定义的AuthenticationProvider设置进去
        http.authenticationProvider(myAuthenticationProvider)
                .authenticationProvider(smsAuthenticationProvider);
    }

    private AccessDecisionManager customizeAccessDecisionManager() {

        List<AccessDecisionVoter<? extends Object>> decisionVoterList
                = Arrays.asList(
                new SmsRoleBasedVoter()
        );
        return new AffirmativeBased(decisionVoterList);
    }
}
完成之后可以,启动项目进行验证。
至此,security的认证授权流程,及其实现过程已经完结。
我已将代码上传到github上,有兴趣可以去看下代码