概述
Spring Security是一个安全框架,提供身份认证、授权和常见攻击的防护
那么如何定义安全呢?
简单来说,就是你有没有进入系统的权限,以及能够访问什么样的资源的权限(包含页面按钮等)。
这些功能是每一个系统必须包含包含的,每个系统都必须重复这样一套代码。基于这样的背景,Spring抽象出一套通用的代码,在此基础上我们只需要定制化开发即可,这就诞生了Spring-Security。
架构
我们先大概了解下Spring-Security的架构,从而对其有个大概的感知。
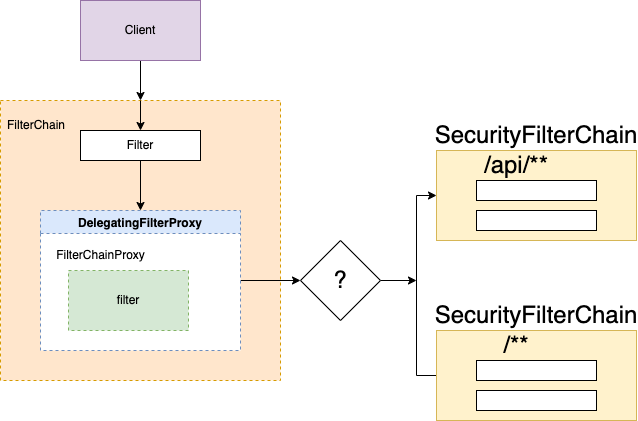
- 从客户端发出的请求,首先经过servlet容器的FilterChain,进入一个个filter中
- DelegatingFilterProxy是继承自Filter的一个类,用于将FilterChainProxy嵌入到webfilter中
- 请求到达FilterChainProxy之后,FilterChainProxy会根据请求的路径,将请求转发到不同的SpringSecurity定义的过滤器链上
- 请求到达Spring Security Chain上后,执行过滤器链中定义的Filter(spring默认过滤器种类)
以上,就是Spring-Security大体架构。
实践
创建一个SpringBoot项目,添加以下依赖
<dependencies>
  <dependency>
    <groupId>org.springframework.boot</groupId>
    <artifactId>spring-boot-starter-security</artifactId>
  </dependency>
  <dependency>
    <groupId>org.springframework.boot</groupId>
    <artifactId>spring-boot-starter-web</artifactId>
  </dependency>
  <dependency>
    <groupId>org.springframework.boot</groupId>
    <artifactId>spring-boot-starter-thymeleaf</artifactId>
  </dependency>
  <dependency>
    <groupId>org.projectlombok</groupId>
    <artifactId>lombok</artifactId>
    <optional>true</optional>
  </dependency>
  <dependency>
    <groupId>org.springframework.boot</groupId>
    <artifactId>spring-boot-starter-test</artifactId>
    <scope>test</scope>
  </dependency>
  <dependency>
    <groupId>org.springframework.security</groupId>
    <artifactId>spring-security-test</artifactId>
    <scope>test</scope>
  </dependency>
</dependencies>
直接运行项目,可以看到控制台打印出密码:
2022-03-02 17:35:20.233  INFO 7930 --- [           main] .s.s.UserDetailsServiceAutoConfiguration :

Using generated security password: fe636539-f71f-4408-a192-94047e6cf68c
打开浏览器,输入地址
localhost:8080/private,发现跳转到登录界面,用户名输入user,密码输入上面控制台打印出的密码,即可登录成功
自此,一个简单的Spring-Security应用已经搭建好了。
流程分析
看到这,大家可能对认证的过程一脸懵逼。不要急,笔者这就带着大家一起分析整个认证过程。
首先,还是看图,以下是刚才登录流程的流程图:
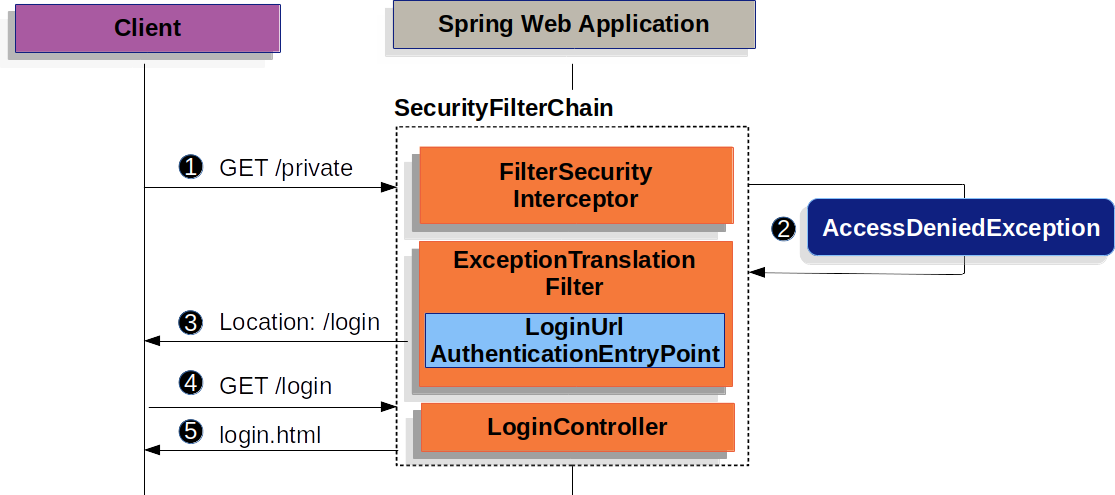
- 首先用户请求未经授权的资源
FilterSecurityInterceptor判断是否授权过,如果未授权抛出AccessDeniedException异常- 由于未授权,
ExceptionTranslationFilter启动授权过程,并通过配置类AuthenticationEntryPoint发送重定到登录页 - 然后,浏览器将请求重定向到的登录页面
这就是刚才重定向的流程,下面的就是登录认证的流程:
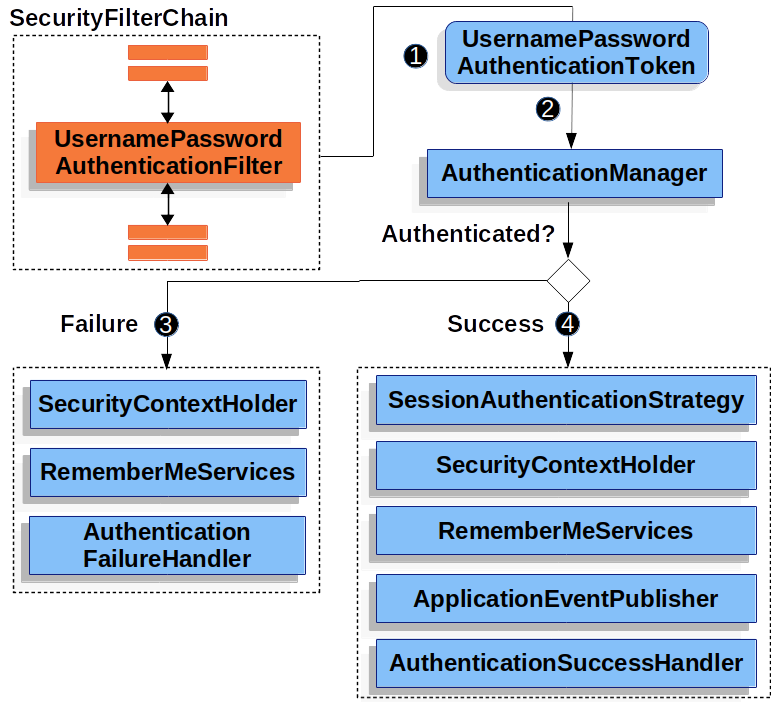
- 当用户在登录页面提交之后,请求通过过滤器链来到
UsernamePasswordAuthenticationFilter这个过滤器中,创建一个UsernamePasswordAuthenticationToken(简单当成一个存储用户名密码的对象,后面会详细分析),注意这个时候还没有认证 - 通过
AuthenticationManager对象进行认证(也就是比对用户名密码)的操作 - 成功,执行一些操作
- 失败,执行另一些操作
以上,就是认证的大致流程。自此,可能还是有些不太明白具体怎么操作的,接下来我们深入源码来仔细剖析。
源码分析
我们可以看到,认证的关键流程是在一个叫做UsernamePasswordAuthenticationFilter开始的,我们打开源码查看他的继承结构:
GenericFilterBean (org.springframework.web.filter)
    AbstractAuthenticationProcessingFilter (org.springframework.security.web.authentication)
        UsernamePasswordAuthenticationFilter (org.springframework.security.web.authentication)
可以发现,这是一个典型的模版方法模式,抽象类定义了大部分流程,实现类实现自定义部分。因此,我们的观察重点来到AbstractAuthenticationProcessingFilter类,又由于它是一个Filter类,我们直接从doFilter方法开始:
//继承filter实现的doFilter方法
public void doFilter(ServletRequest request, ServletResponse response, FilterChain chain)
  throws IOException, ServletException {
  doFilter((HttpServletRequest) request, (HttpServletResponse) response, chain);
}
//真正执行逻辑的方法
private void doFilter(HttpServletRequest request, HttpServletResponse response, FilterChain chain)
  throws IOException, ServletException {
  //判断当前请求是否会被该过滤器请求
  if (!requiresAuthentication(request, response)) {
    chain.doFilter(request, response);
    return;
  }
  try {
    //认证逻辑,由其子类实现,即UsernamePasswordAuthenticationFilter.attemptAuthentication方法
    Authentication authenticationResult = attemptAuthentication(request, response);
    if (authenticationResult == null) {
      // return immediately as subclass has indicated that it hasn't completed
      return;
    }
    //认证成功,设置session策略
    this.sessionStrategy.onAuthentication(authenticationResult, request, response);
    // Authentication success
    if (this.continueChainBeforeSuccessfulAuthentication) {
      chain.doFilter(request, response);
    }
    //认证成功,保存一些状态
    successfulAuthentication(request, response, chain, authenticationResult);
  }
  catch (InternalAuthenticationServiceException failed) {
    this.logger.error("An internal error occurred while trying to authenticate the user.", failed);
    unsuccessfulAuthentication(request, response, failed);
  }
  catch (AuthenticationException ex) {
    // 认证失败,清除一些状态
    unsuccessfulAuthentication(request, response, ex);
  }
}

//判断当前请求是否会被该过滤器请求
protected boolean requiresAuthentication(HttpServletRequest request, HttpServletResponse response) {
  //注意这个参数,是他的实现类初始化的时候构造的,详见UsernamePasswordAuthenticationFilter构造方法
  if (this.requiresAuthenticationRequestMatcher.matches(request)) {
    return true;
  }
  if (this.logger.isTraceEnabled()) {
    this.logger
      .trace(LogMessage.format("Did not match request to %s", this.requiresAuthenticationRequestMatcher));
  }
  return false;
}
UsernamePasswordAuthenticationFilter:
public class UsernamePasswordAuthenticationFilter extends AbstractAuthenticationProcessingFilter {

    public static final String SPRING_SECURITY_FORM_USERNAME_KEY = "username";

    public static final String SPRING_SECURITY_FORM_PASSWORD_KEY = "password";

    private static final AntPathRequestMatcher DEFAULT_ANT_PATH_REQUEST_MATCHER = new AntPathRequestMatcher("/login",
            "POST");

    private String usernameParameter = SPRING_SECURITY_FORM_USERNAME_KEY;

    private String passwordParameter = SPRING_SECURITY_FORM_PASSWORD_KEY;

    private boolean postOnly = true;

    public UsernamePasswordAuthenticationFilter() {
        super(DEFAULT_ANT_PATH_REQUEST_MATCHER);
    }

    public UsernamePasswordAuthenticationFilter(AuthenticationManager authenticationManager) {
        super(DEFAULT_ANT_PATH_REQUEST_MATCHER, authenticationManager);
    }

    @Override
    public Authentication attemptAuthentication(HttpServletRequest request, HttpServletResponse response)
            throws AuthenticationException {
    //只支持POST方法
        if (this.postOnly && !request.getMethod().equals("POST")) {
            throw new AuthenticationServiceException("Authentication method not supported: " + request.getMethod());
        }
    //获取用户名称
        String username = obtainUsername(request);
        username = (username != null) ? username : "";
        username = username.trim();
    //获取密码
        String password = obtainPassword(request);
        password = (password != null) ? password : "";
    //创建一个Authentication,其中authenticated=false,代表未认证成功
        UsernamePasswordAuthenticationToken authRequest = new UsernamePasswordAuthenticationToken(username, password);
        // Allow subclasses to set the "details" property
        setDetails(request, authRequest);
    //调用AuthenticationManager.authenticate方法进行认证
        return this.getAuthenticationManager().authenticate(authRequest);
    }
}

    @Nullable
    protected String obtainPassword(HttpServletRequest request) {
        return request.getParameter(this.passwordParameter);
    }

    @Nullable
    protected String obtainUsername(HttpServletRequest request) {
        return request.getParameter(this.usernameParameter);
    }
AuthenticaitonManager默认实现类ProviderManager:
public Authentication authenticate(Authentication authentication) throws AuthenticationException {
        Class<? extends Authentication> toTest = authentication.getClass();
        AuthenticationException lastException = null;
        AuthenticationException parentException = null;
        Authentication result = null;
        Authentication parentResult = null;
        int currentPosition = 0;
        int size = this.providers.size();
        for (AuthenticationProvider provider : getProviders()) {
            if (!provider.supports(toTest)) {
                continue;
            }
            if (logger.isTraceEnabled()) {
                logger.trace(LogMessage.format("Authenticating request with %s (%d/%d)",
                        provider.getClass().getSimpleName(), ++currentPosition, size));
            }
            try {
        //注意⚠️
        //注意⚠️
        //注意⚠️
        //核心代码在这,通过遍历所有的AuthenticationProvider
        //如果有一个认证成功,就跳出循环,否者继续循环,循环完毕没有成功,就抛出异常
                result = provider.authenticate(authentication);
                if (result != null) {
                    copyDetails(authentication, result);
                    break;
                }
            }
            catch (AccountStatusException | InternalAuthenticationServiceException ex) {
                prepareException(ex, authentication);
                // SEC-546: Avoid polling additional providers if auth failure is due to
                // invalid account status
                throw ex;
            }
            catch (AuthenticationException ex) {
                lastException = ex;
            }
        }
        if (result == null && this.parent != null) {
            // Allow the parent to try.
            try {
                parentResult = this.parent.authenticate(authentication);
                result = parentResult;
            }
            catch (ProviderNotFoundException ex) {
                // ignore as we will throw below if no other exception occurred prior to
                // calling parent and the parent
                // may throw ProviderNotFound even though a provider in the child already
                // handled the request
            }
            catch (AuthenticationException ex) {
                parentException = ex;
                lastException = ex;
            }
        }
        if (result != null) {
            if (this.eraseCredentialsAfterAuthentication && (result instanceof CredentialsContainer)) {
                // Authentication is complete. Remove credentials and other secret data
                // from authentication
                ((CredentialsContainer) result).eraseCredentials();
            }
            // If the parent AuthenticationManager was attempted and successful then it
            // will publish an AuthenticationSuccessEvent
            // This check prevents a duplicate AuthenticationSuccessEvent if the parent
            // AuthenticationManager already published it
            if (parentResult == null) {
                this.eventPublisher.publishAuthenticationSuccess(result);
            }

            return result;
        }

        // Parent was null, or didn't authenticate (or throw an exception).
        if (lastException == null) {
            lastException = new ProviderNotFoundException(this.messages.getMessage("ProviderManager.providerNotFound",
                    new Object[] { toTest.getName() }, "No AuthenticationProvider found for {0}"));
        }
        // If the parent AuthenticationManager was attempted and failed then it will
        // publish an AbstractAuthenticationFailureEvent
        // This check prevents a duplicate AbstractAuthenticationFailureEvent if the
        // parent AuthenticationManager already published it
        if (parentException == null) {
            prepareException(lastException, authentication);
        }
        throw lastException;
    }
关键问题来了,AuthenticationProvider是干嘛的?我们可以打个断点,发现他先走的AnonymousAuthenticationProvider这个,但是后来发现不支持,然后找他的父AuthenticaitonManager,里面默认走的DaoAuthenticationProvider,因此我们只需要看这个就好了。同样的,DaoAuthenticationProvider也是一个模版方法实践的案例,我们通过AbstractUserDetailsAuthenticationProvider可以找到执行流程:
//AbstractUserDetailsAuthenticationProvider类下面的方法
public Authentication authenticate(Authentication authentication) throws AuthenticationException {
        Assert.isInstanceOf(UsernamePasswordAuthenticationToken.class, authentication,
                () -> this.messages.getMessage("AbstractUserDetailsAuthenticationProvider.onlySupports",
                        "Only UsernamePasswordAuthenticationToken is supported"));
      //获取用户名,authentication目前未认证
        String username = determineUsername(authentication);
    //用户有无被缓存
        boolean cacheWasUsed = true;
        UserDetails user = this.userCache.getUserFromCache(username);
        if (user == null) {
            cacheWasUsed = false;
            try {
        //authentication目前未认证
        //从子类实现取用户,user对象是从子类的取,一般是从数据库取,所以代表这个对象是实际用户存的
                user = retrieveUser(username, (UsernamePasswordAuthenticationToken) authentication);
            }
            catch (UsernameNotFoundException ex) {
                this.logger.debug("Failed to find user '" + username + "'");
                if (!this.hideUserNotFoundExceptions) {
                    throw ex;
                }
                throw new BadCredentialsException(this.messages
                        .getMessage("AbstractUserDetailsAuthenticationProvider.badCredentials", "Bad credentials"));
            }
            Assert.notNull(user, "retrieveUser returned null - a violation of the interface contract");
        }
  //缓存直接走下面流程
        try {
      //检查操作,暂时不理会
            this.preAuthenticationChecks.check(user);
      //关键点
      //user是实际用户存的,authentication是通过前面请求参数封装的未认证
      //这一步就是比对过程,还是在子类中实现
            additionalAuthenticationChecks(user, (UsernamePasswordAuthenticationToken) authentication);
        }
        catch (AuthenticationException ex) {
            if (!cacheWasUsed) {
                throw ex;
            }
            // There was a problem, so try again after checking
            // we're using latest data (i.e. not from the cache)
            cacheWasUsed = false;
            user = retrieveUser(username, (UsernamePasswordAuthenticationToken) authentication);
            this.preAuthenticationChecks.check(user);
            additionalAuthenticationChecks(user, (UsernamePasswordAuthenticationToken) authentication);
        }
        this.postAuthenticationChecks.check(user);
        if (!cacheWasUsed) {
            this.userCache.putUserInCache(user);
        }
        Object principalToReturn = user;
        if (this.forcePrincipalAsString) {
            principalToReturn = user.getUsername();
        }
        return createSuccessAuthentication(principalToReturn, authentication, user);
    }

//子类DaoAuthenticationProvider的实现
    protected final UserDetails retrieveUser(String username, UsernamePasswordAuthenticationToken authentication)
            throws AuthenticationException {
        prepareTimingAttackProtection();
        try {
      //通过UserDetailService取鱼用户名,并进行比对
            UserDetails loadedUser = this.getUserDetailsService().loadUserByUsername(username);
            if (loadedUser == null) {
                throw new InternalAuthenticationServiceException(
                        "UserDetailsService returned null, which is an interface contract violation");
            }
            return loadedUser;
        }
        catch (UsernameNotFoundException ex) {
            mitigateAgainstTimingAttack(authentication);
            throw ex;
        }
        catch (InternalAuthenticationServiceException ex) {
            throw ex;
        }
        catch (Exception ex) {
            throw new InternalAuthenticationServiceException(ex.getMessage(), ex);
        }
    }
//子类DaoAuthenticationProvider的实现
//真实信息和参数中取的信息的比对过程,也就是认证过程
    protected void additionalAuthenticationChecks(UserDetails userDetails,
            UsernamePasswordAuthenticationToken authentication) throws AuthenticationException {
        if (authentication.getCredentials() == null) {
            this.logger.debug("Failed to authenticate since no credentials provided");
            throw new BadCredentialsException(this.messages
                    .getMessage("AbstractUserDetailsAuthenticationProvider.badCredentials", "Bad credentials"));
        }
        String presentedPassword = authentication.getCredentials().toString();
        if (!this.passwordEncoder.matches(presentedPassword, userDetails.getPassword())) {
            this.logger.debug("Failed to authenticate since password does not match stored value");
            throw new BadCredentialsException(this.messages
                    .getMessage("AbstractUserDetailsAuthenticationProvider.badCredentials", "Bad credentials"));
        }
    }
以上,就是默认实现的整个认证流程,流程图可以参考下面的图:
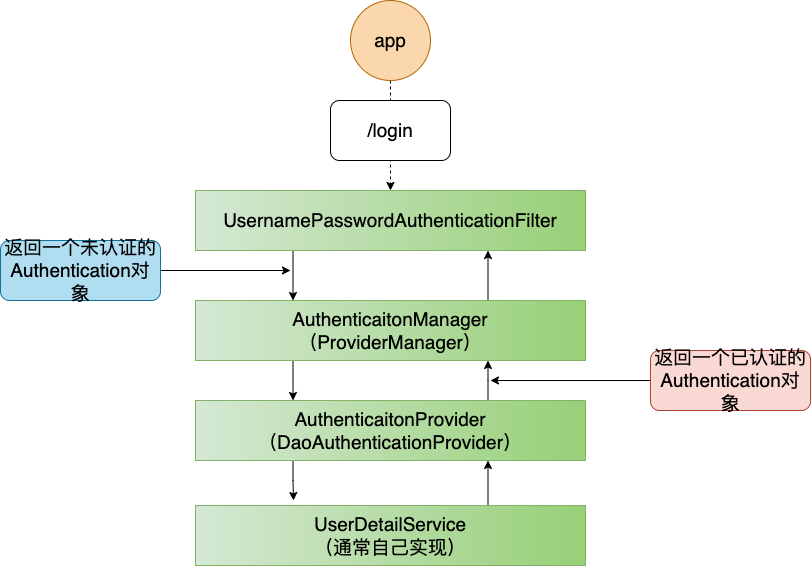
实现前后端分离的认证过程
目前绝大多数的项目都是前后端分离的项目,而Spring-Security默认实现的是表单登录,所以需要对其进行一些改造来满足我们的需求。
注意,我们暂时还是使用form表单的参数、url,只是改为Ajax提交
按照上面的流程图一步步替换,首先创建一个自己的Filter,由于使用的还是表单登录的filter,直接继承
UsernamePasswordAuthenticationFilter即可@Slf4j public class MyLoginAuthenticationFilter extends UsernamePasswordAuthenticationFilter {public MyLoginAuthenticationFilter() { //直接使用父类的配置 super(); } @Override public Authentication attemptAuthentication(HttpServletRequest request, HttpServletResponse response) throws AuthenticationException { //只支持post提交 if (!request.getMethod().equals(HttpMethod.POST.name())) { throw new AuthenticationServiceException("Authentication method not supported: " + request.getMethod()); } UsernamePasswordAuthenticationToken unAuthenticaiton = null; try { Map<String, String> map = getStringStringMap(request); String username = map.get("username").trim(); String password = map.get("password").trim(); //创建一个未认证的Authentication unAuthenticaiton = new UsernamePasswordAuthenticationToken(username, password); }catch (Exception e){ log.error("解析错误:{}", e.getMessage()); } return getAuthenticationManager().authenticate(unAuthenticaiton); } /** * 将request中的用户名、密码提取出来封装到map中 * @param request * @return * @throws IOException */ private Map<String, String> getStringStringMap(HttpServletRequest request) throws IOException { BufferedReader reader = request.getReader(); StringBuilder builder = new StringBuilder(); String line = reader.readLine(); while (line != null) { builder.append(line); line = reader.readLine(); } reader.close(); String reqBody = builder.toString(); //JsonUtil是自己写的工具类,将string转成对象,可以直接用其他工具实现 JsonParser parse = JsonUtil.parse(reqBody); Map<String, String> map = parse.readValueAs(Map.class); return map; }}
2. 替换`AuthenticaitonManager`,但是由于其默认实现类`ProviderManager`逻辑是通用的,所以我们这个场景没有必要替换

3. 替换`AuthenticaitonProvider`,其中`UserServiceImpl`是我们自己的实现类

```java
@Component
public class MyAuthenticationProvider extends AbstractUserDetailsAuthenticationProvider {

    @Autowired
    public UserServiceImpl userService;

      //对密码进行加密的类,Security中密码对比就是加密后比对是否一致
    @Autowired
    @Lazy
    public BCryptPasswordEncoder bCryptPasswordEncoder;

    /**
     * 执行密码校验
     * @param userDetails
     * @param authentication
     * @throws AuthenticationException
     */
    @Override
    protected void additionalAuthenticationChecks(UserDetails userDetails, UsernamePasswordAuthenticationToken authentication) throws AuthenticationException {
        if (authentication.getCredentials() == null) {
            this.logger.debug("Failed to authenticate since no credentials provided");
            throw new BadCredentialsException(this.messages
                    .getMessage("AbstractUserDetailsAuthenticationProvider.badCredentials", "Bad credentials"));
        }
        String presentedPassword = authentication.getCredentials().toString();
        if (!this.bCryptPasswordEncoder.matches(presentedPassword, userDetails.getPassword())) {
            this.logger.debug("Failed to authenticate since password does not match stored value");
            throw new BadCredentialsException(this.messages
                    .getMessage("AbstractUserDetailsAuthenticationProvider.badCredentials", "Bad credentials"));
        }
    }


    /**
     * 获取密码参数,这个地方获取的就是可信任的
     * 一般从数据库或者其他服务获取
     * @param username
     * @param authentication
     * @return
     * @throws AuthenticationException
     */
    @Override
    protected UserDetails retrieveUser(String username, UsernamePasswordAuthenticationToken authentication) throws AuthenticationException {
        UserDetails loadedUser = userService.loadUserByUsername(username);
        if (loadedUser == null) {
            throw new InternalAuthenticationServiceException(
                    "UserDetailsService returned null, which is an interface contract violation");
        }
        return loadedUser;
    }

}
实现自己的UserService类,关键点在于实现
UserDetailsService接口。通常,这里就是从数据库或者服务中获取,这里简单演示下流程。public interface UserService { }@Service(value = “userService”)
public class UserServiceImpl implements UserService, UserDetailsService {@Override public UserDetails loadUserByUsername(String username) throws UsernameNotFoundException { if (!"zhuchong".equals(username)) { throw new UsernameNotFoundException("找不到用户"); } //添加角色 List<GrantedAuthority> grantedAuthorities = AuthorityUtils.commaSeparatedStringToAuthorityList("ADMIN,USER"); String encode = new BCryptPasswordEncoder().encode("123"); //这个是security默认提供的,一般我们需要实现自己的User类,实现UserDetails接口即可 //这里偷懒直接用现成的 return new User("zhuchong", encode, grantedAuthorities); }}
5. 自此,我们所有流程基本修改完毕,但是还有最重要的一个就是把这些修改过的类配置进security中

```java
@Configuration
@EnableWebSecurity
public class SecurityConfig extends WebSecurityConfigurerAdapter {
    @Autowired
    private MyAuthenticationProvider myAuthenticationProvider;


    @Bean
    public BCryptPasswordEncoder bCryptPasswordEncoder() {
        return new BCryptPasswordEncoder();
    }

    @Bean
    public MyLoginAuthenticationFilter myLoginAuthenticationFilter() throws Exception {
        MyLoginAuthenticationFilter filter = new MyLoginAuthenticationFilter();

        //对这个filter设置AuthenticationManager,取默认的
        filter.setAuthenticationManager(authenticationManagerBean());
        //设置成功的处理器,由于要返回json,所以进行一些处理
        filter.setAuthenticationSuccessHandler((request, response, authentication) -> {
            //登录成功时返回给前端的数据
            Map result = new HashMap();
            result.put("success", "登录成功");
            response.setContentType("application/json;charset=utf-8");
            response.getWriter().write(JsonUtil.jsonToString(result));
        });
        //设置失败的处理器,由于要返回json,所以进行一些处理
        filter.setAuthenticationFailureHandler((request, response, exception) -> {
            Map result = new HashMap();

            if (exception instanceof UsernameNotFoundException) {
                result.put("fail", exception.getMessage());
            } else if (exception instanceof BadCredentialsException) {
                result.put("fail", "密码错误" + exception.getMessage());
            } else {
                result.put("fail", "其他异常");
            }
            response.setContentType("application/json;charset=utf-8");
            response.getWriter().write(JsonUtil.jsonToString(result));
        });
        return filter;
    }

    @Override
    protected void configure(HttpSecurity http) throws Exception {
        //关闭跨域和csrf防护
        http.cors().and().csrf().disable();
        //对请求url进行防护
        http.authorizeRequests()
                .antMatchers("/index").hasRole("USER")
                .antMatchers("hello").hasRole("admin")

                .and()
                .formLogin()
                .permitAll()

                .and()
                .logout()
                .permitAll()
                .logoutSuccessHandler((request, response, authentication) -> {
                    //登出成功时返回给前端的数据
                    Map result = new HashMap();
                    result.put("success", "注销成功");
                    response.setContentType("application/json;charset=utf-8");
                    response.getWriter().write(JsonUtil.jsonToString(result));
                })
                .deleteCookies("JSESSIONID")

                .and()
                .exceptionHandling()
                .accessDeniedHandler((request, response, exception) -> {
                    //访问拒绝时返回给前端的数据
                    Map result = new HashMap();
                    result.put("success", "无权访问,need Authorities!!");
                    response.setContentType("application/json;charset=utf-8");
                    response.getWriter().write(JsonUtil.jsonToString(result));
                })
                .authenticationEntryPoint((request, response, exception) -> {
                    //访问有权限url时进行拦截
                    Map result = new HashMap();
                    result.put("success", "需要登录!!");
                    response.setContentType("application/json;charset=utf-8");
                    response.getWriter().write(JsonUtil.jsonToString(result));
                })
                .and()
                .sessionManagement()
                .maximumSessions(1)     //最多只能一个用户登录一个账号
                .expiredSessionStrategy(event -> {
                    //session策略的返回
                    Map result = new HashMap();
                    result.put("success", "您的账号在异地登录,建议修改密码!!");
                    HttpServletResponse response = event.getResponse();
                    response.setContentType("application/json;charset=utf-8");
                    response.getWriter().write(JsonUtil.jsonToString(result));
                });
        //把filter添加到UsernamePasswordAuthenticationFilter这个过滤器位置
        http.addFilterAt(myLoginAuthenticationFilter(), UsernamePasswordAuthenticationFilter.class);

        //把自定义的AuthenticationProvider设置进去
        http.authenticationProvider(myAuthenticationProvider);
    }
}
自此,已经完成改造。可以在postman上测试一下,基本上入参返回值都能使用json来展示。
自定义短信登录
我们可以模仿UsernamePasswordAuthenticationFilter来实现,短信的Filter
创建一个用于实现短信功能的Filter,
SmsLoginAuthenticationFilterpublic class SmsLoginAuthenticationFilter extends AbstractAuthenticationProcessingFilter { Map<String,String> map= new HashMap<>(); //定义短信接口的入参 public static final String SPRING_SECURITY_FORM_USERNAME_KEY = "userPhone"; public static final String SPRING_SECURITY_FORM_PASSWORD_KEY = "code"; private String usernameParameter = SPRING_SECURITY_FORM_USERNAME_KEY; private String passwordParameter = SPRING_SECURITY_FORM_PASSWORD_KEY; //定义短信接口的url和方法类型 private static final AntPathRequestMatcher DEFAULT_ANT_PATH_REQUEST_MATCHER = new AntPathRequestMatcher("/smsLogin", "POST"); public SmsLoginAuthenticationFilter() { super(DEFAULT_ANT_PATH_REQUEST_MATCHER); }public SmsLoginAuthenticationFilter(AuthenticationManager authenticationManager) { super(DEFAULT_ANT_PATH_REQUEST_MATCHER, authenticationManager); } @Override public Authentication attemptAuthentication(HttpServletRequest request, HttpServletResponse response) throws AuthenticationException, IOException, ServletException { //只支持post提交 if (!request.getMethod().equals(HttpMethod.POST.name())) { throw new AuthenticationServiceException("Authentication method not supported: " + request.getMethod()); } //取出reqest的手机号 String username = obtainUsername(request); username = (username != null) ? username : ""; username = username.trim(); //取出request的验证码 String password = obtainPassword(request); password = (password != null) ? password : ""; //创建一个自定义的Authentication对象 SmsAuthenticationToken smsAuthenticationToken = new SmsAuthenticationToken(username, password); //把request的一些参数绑定到smsAuthenticationToken对象中,具体可以断点查看 setDetails(request, smsAuthenticationToken); //调用AuthenticationManager的authenticate方法 return this.getAuthenticationManager().authenticate(smsAuthenticationToken); } protected void setDetails(HttpServletRequest request, SmsAuthenticationToken authRequest) { authRequest.setDetails(this.authenticationDetailsSource.buildDetails(request)); } @Nullable protected String obtainPassword(HttpServletRequest request) throws IOException { return map.get(passwordParameter); } @Nullable protected String obtainUsername(HttpServletRequest request) throws IOException { getStringStringMap(request); return map.get(usernameParameter); } /** * 将request中的用户名、密码提取出来封装到map中 * @param request * @return * @throws IOException */ private Map<String, String> getStringStringMap(HttpServletRequest request) throws IOException { BufferedReader reader = request.getReader(); StringBuilder builder = new StringBuilder(); String line = reader.readLine(); while (line != null) { builder.append(line); line = reader.readLine(); } reader.close(); String reqBody = builder.toString(); JsonParser parse = JsonUtil.parse(reqBody); map = parse.readValueAs(Map.class); return map; }}
2. 自定义一个`Authentication`类,名字是`SmsAuthenticationToken`,用于自定义的短信信息,这个基本照抄`UsernamePasswordAuthenticationToken`

```java
public class SmsAuthenticationToken extends AbstractAuthenticationToken {
    private static final long serialVersionUID = SpringSecurityCoreVersion.SERIAL_VERSION_UID;

    private final Object principal;

    private Object credentials;

    public SmsAuthenticationToken(Object principal, Object credentials) {
        super(null);
        this.principal = principal;
        this.credentials = credentials;
    }

    public SmsAuthenticationToken(Collection<? extends GrantedAuthority> authorities, Object principal, Object credentials) {
        super(authorities);
        this.principal = principal;
        this.credentials = credentials;
        super.setAuthenticated(true);
    }

    @Override
    public Object getCredentials() {
        return this.credentials;
    }

    @Override
    public Object getPrincipal() {
        return this.principal;
    }
}
第1步中调用AuthenticationManager的authenticate方法,由于AuthenticationManager实现类ProviderManager比较通用,可以不用重新实现
创建一个
AuthenticationProvider的实现类SmsAuthenticationProvider,用于实现具体查找可信任的验证码信息@Component public class SmsAuthenticationProvider implements AuthenticationProvider { @Autowired private SmsServiceImpl smsService; @Override public Authentication authenticate(Authentication authentication) throws AuthenticationException { SmsAuthenticationToken smsAuthenticationToken = (SmsAuthenticationToken) authentication; //请求参数获取的 String unAuthenticationCode = authentication.getCredentials().toString(); //从后台缓存获取的 String authenticationCode = smsService.getCode(smsAuthenticationToken.getPrincipal().toString()); if (authenticationCode == null) { throw new InternalAuthenticationServiceException( "UserDetailsService returned null, which is an interface contract violation"); } if (!unAuthenticationCode.equals(authenticationCode)) { throw new BadCredentialsException("AbstractUserDetailsAuthenticationProvider.badCredentials"); } //验证通过,从数据库取user,填充到userDetails中 UserDetails user = smsService.loadUserByUsername(smsAuthenticationToken.getPrincipal().toString()); return createSuccessAuthentication(authentication, user); } private Authentication createSuccessAuthentication(Authentication authentication, UserDetails smsDetail) { //主要拼一个 SmsAuthenticationToken authenticationToken = new SmsAuthenticationToken(smsDetail.getAuthorities(), smsDetail.getUsername(), smsDetail.getPassword()); authenticationToken.setDetails(authentication.getDetails()); return authenticationToken; } @Override public boolean supports(Class<?> authentication) { return (SmsAuthenticationToken.class.isAssignableFrom(authentication)); } }由于这个是短信验证功能,和表单提交的有点不一样,因此User对象得定制,所以新增一个SmsDetail类.这个类实现UserDetail接口
@Data
public class SmsDetail implements UserDetails {
    private static final Log logger = LogFactory.getLog(User.class);

    private String password;

    private String username;

    private Set<GrantedAuthority> authorities;

    private boolean accountNonExpired;

    private boolean accountNonLocked;

    private boolean credentialsNonExpired;

    private boolean enabled;

    /**
     * 手机号
     */
    private String phone;
    /**
     * 验证码
     */
    private String code;
}
接下来就是熟悉的controller层和service层
@RestController
public class SmsLoginController {

    @PostMapping("/verityCode")
    @ResponseBody
    Result login(@RequestBody Map<String, String> map) {
        String username = map.get("userPhone");
        //如果用户存在,发送验证码
        Boolean checkUserExist = true;
        if(checkUserExist){
            //假装是一个随机的字符串
            String code = "66666";
            CacheUtil.put("sms"+username,code);
            return Result.ok(code);
        }
        return Result.ok();
    }

}
@Service(value = “smsService”)
public class SmsServiceImpl implements UserService, UserDetailsService {public String getCode(String phone) throws UsernameNotFoundException { //这里就是通过phone去缓存中取数据 String key = "sms"+phone; String code = CacheUtil.get(key); if(code == null){ throw new UsernameNotFoundException("验证码不存在"); } return code; } @Override public UserDetails loadUserByUsername(String phone) throws UsernameNotFoundException { //通过手机号查找用户 if (!"131".equals(phone)) { throw new UsernameNotFoundException("找不到用户"); } List<GrantedAuthority> grantedAuthorities = AuthorityUtils.commaSeparatedStringToAuthorityList("ADMIN,USER"); String encode = new BCryptPasswordEncoder().encode("123"); return new User("zhuchong", encode, grantedAuthorities); }}
添加配置,将我们刚才的自定义的类设置进去
@Configuration
@EnableWebSecurity
public class SecurityConfig extends WebSecurityConfigurerAdapter {
    @Autowired
    private MyAuthenticationProvider myAuthenticationProvider;

    @Autowired
    private SmsAuthenticationProvider smsAuthenticationProvider;
@Bean public BCryptPasswordEncoder bCryptPasswordEncoder() { return new BCryptPasswordEncoder(); } @Bean public SmsLoginAuthenticationFilter smsLoginAuthenticationFilter() throws Exception{ SmsLoginAuthenticationFilter filter = new SmsLoginAuthenticationFilter(); //对这个filter设置AuthenticationManager,取默认的ProviderManager filter.setAuthenticationManager(authenticationManagerBean()); //设置成功的处理器,由于要返回json,所以进行一些处理 filter.setAuthenticationSuccessHandler((request, response, authentication) -> { //登录成功时返回给前端的数据 Map result = new HashMap(); result.put("success", "sms登录成功"); response.setContentType("application/json;charset=utf-8"); response.getWriter().write(JsonUtil.jsonToString(result)); }); //设置失败的处理器,由于要返回json,所以进行一些处理 filter.setAuthenticationFailureHandler((request, response, exception) -> { Map result = new HashMap(); if (exception instanceof UsernameNotFoundException) { result.put("fail", exception.getMessage()); } else if (exception instanceof BadCredentialsException) { result.put("fail", "sms密码错误" + exception.getMessage()); } else { result.put("fail", "sms其他异常"); } response.setContentType("application/json;charset=utf-8"); response.getWriter().write(JsonUtil.jsonToString(result)); }); return filter; } @Bean public MyLoginAuthenticationFilter myLoginAuthenticationFilter() throws Exception { MyLoginAuthenticationFilter filter = new MyLoginAuthenticationFilter(); //对这个filter设置AuthenticationManager,取默认的 filter.setAuthenticationManager(authenticationManagerBean()); //设置成功的处理器,由于要返回json,所以进行一些处理 filter.setAuthenticationSuccessHandler((request, response, authentication) -> { //登录成功时返回给前端的数据 Map result = new HashMap(); result.put("success", "登录成功"); response.setContentType("application/json;charset=utf-8"); response.getWriter().write(JsonUtil.jsonToString(result)); }); //设置失败的处理器,由于要返回json,所以进行一些处理 filter.setAuthenticationFailureHandler((request, response, exception) -> { Map result = new HashMap(); if (exception instanceof UsernameNotFoundException) { result.put("fail", exception.getMessage()); } else if (exception instanceof BadCredentialsException) { result.put("fail", "密码错误" + exception.getMessage()); } else { result.put("fail", "其他异常"); } response.setContentType("application/json;charset=utf-8"); response.getWriter().write(JsonUtil.jsonToString(result)); }); return filter; } @Override protected void configure(HttpSecurity http) throws Exception { //关闭跨域和csrf防护 http.cors().and().csrf().disable(); //对请求url进行防护 http.authorizeRequests() .antMatchers("/index").hasRole("USER") .antMatchers("hello").hasRole("admin") .and() .authorizeRequests() //放行这些路径 .antMatchers("/smsLogin","verityCode","/login") .permitAll() .and() .formLogin() .permitAll() .and() .logout() .permitAll() .logoutSuccessHandler((request, response, authentication) -> { //登出成功时返回给前端的数据 Map result = new HashMap(); result.put("success", "注销成功"); response.setContentType("application/json;charset=utf-8"); response.getWriter().write(JsonUtil.jsonToString(result)); }) .deleteCookies("JSESSIONID") .and() .exceptionHandling() .accessDeniedHandler((request, response, exception) -> { //访问拒绝时返回给前端的数据 Map result = new HashMap(); result.put("success", "无权访问,need Authorities!!"); response.setContentType("application/json;charset=utf-8"); response.getWriter().write(JsonUtil.jsonToString(result)); }) .authenticationEntryPoint((request, response, exception) -> { //访问有权限url时进行拦截 Map result = new HashMap(); result.put("success", "需要登录!!"); response.setContentType("application/json;charset=utf-8"); response.getWriter().write(JsonUtil.jsonToString(result)); }) .and() .sessionManagement() .maximumSessions(1) //最多只能一个用户登录一个账号 .expiredSessionStrategy(event -> { //session策略的返回 Map result = new HashMap(); result.put("success", "您的账号在异地登录,建议修改密码!!"); HttpServletResponse response = event.getResponse(); response.setContentType("application/json;charset=utf-8"); response.getWriter().write(JsonUtil.jsonToString(result)); }); //把filter添加到UsernamePasswordAuthenticationFilter这个过滤器位置 http.addFilterAt(myLoginAuthenticationFilter(), UsernamePasswordAuthenticationFilter.class) .addFilterAfter(smsLoginAuthenticationFilter(), UsernamePasswordAuthenticationFilter.class); //把自定义的AuthenticationProvider设置进去 http.authenticationProvider(myAuthenticationProvider) .authenticationProvider(smsAuthenticationProvider); }ok完成,启动应用进行验证。首先,先访问
/verityCode接口获取验证码,然后在访问/smsLogin接口进行短信功能的认证过程
自此,我们认证过程就告一段落。限于文笔,笔者讲述的可能不是很清晰,大家配合断点源码食用更佳。
我会把项目上传到github上,以下是链接:spring-security