并发编程基础
线程
为什么使用多线程?只有一个目的就是更好的利用多核cpu的资源。多线程一定快吗?不一定,多线程上下文切换需要花费时间,如果执行的任务比较简单,多线程花的时候可能比串行执行还要慢。
线程的创建
继承
Thread类public class Demo4 { public static void main(String[] args) { new MyTread().start(); } } class MyTread extends Thread{ @Override public void run() { System.out.println("thread:"+Thread.currentThread().getName()); } }实现
Runnable接口new Thread(new Runnable() { @Override public void run() { System.out.println("实现Runnable接口"); } }).start();实现
Callable接口FutureTask<String> stringFutureTask = new FutureTask<>(new Callable<String>() { @Override public String call() throws Exception { return "call接口"; } }); new Thread(stringFutureTask).start(); String s = null; try { s = stringFutureTask.get(); } catch (InterruptedException e) { e.printStackTrace(); } catch (ExecutionException e) { e.printStackTrace(); } System.out.println(s);
线程状态
在Java中,线程状态在Thread类中的枚举中:
public enum State {
  //新建状态,但是没有调用start()方法
  NEW,
  //运行状态,包括正在运行中的,以及等待分配cpu的线程
  RUNNABLE,
  //阻塞状态,代表正在等待获取锁首次进入synchronized代码块或者方法
  //或者重入的线程
  BLOCKED,
  //调用以下不带时间参数的方法,会使线程进入waiting状态
  //Object.wait with no timeout
  //Thread.join with no timeout
  //LockSupport.park
  WAITING,
  //调用以下带时间参数的方法,会使线程进入waiting状态
  //Thread.sleep
  //Object.wait with timeout
  //Thread.join with timeout
  //LockSupport.parkNanos
  //LockSupport.parkUntil
  TIMED_WAITING,
  //完成线程要执行的任务
  TERMINATED;
}
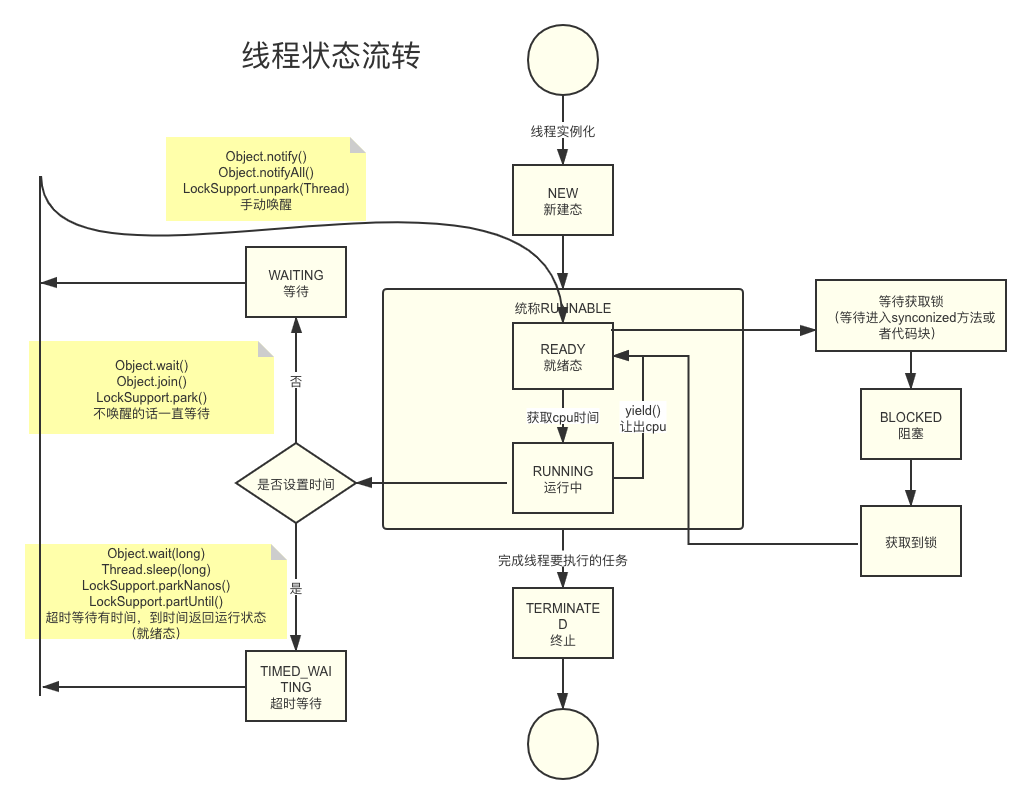
上面是,线程状态流转图。
演示
/**
 * 线程状态演示
 * @author zhuchong
 */
@Slf4j(topic = "test")
public class ThreadStateTest {

    public static void main(String[] args) {

        Thread t1 = new Thread("t1") {
            @Override
            public void run() {
                log.debug("running");
            }
        };

        Thread t2 = new Thread("t2") {
            @Override
            public void run() {
                while (true){

                }
            }
        };
        t2.start();

        Thread t3 = new Thread("t3") {
            @Override
            public void run() {
                log.debug("running");
            }
        };
        t3.start();

        Thread t4 = new Thread("t4") {
            @Override
            public void run() {
                synchronized (ThreadStateTest.class){
                    try {
                        Thread.sleep(10000000);
                    }catch (InterruptedException e){
                        e.printStackTrace();
                    }
                }
            }
        };
        t4.start();


        Thread t5 = new Thread("t5") {
            @Override
            public void run() {
                try {
                    t2.join();
                } catch (InterruptedException e) {
                    e.printStackTrace();
                }
            }
        };
        t5.start();


        Thread t6 = new Thread("t6") {
            @Override
            public void run() {
                synchronized (ThreadStateTest.class){
                    try {
                        Thread.sleep(10000000);
                    }catch (InterruptedException e){
                        e.printStackTrace();
                    }
                }
            }
        };
        t6.start();

        try {
            Thread.sleep(500);
        } catch (InterruptedException e) {
            e.printStackTrace();
        }

        log.debug("t1 state {}", t1.getState());
        log.debug("t2 state {}", t2.getState());
        log.debug("t3 state {}", t3.getState());
        log.debug("t4 state {}", t4.getState());
        log.debug("t5 state {}", t5.getState());
        log.debug("t6 state {}", t6.getState());


    }
}

-------结果------
17:52:31.049 [t3] DEBUG test - running
17:52:31.549 [main] DEBUG test - t1 state NEW
17:52:31.556 [main] DEBUG test - t2 state RUNNABLE
17:52:31.556 [main] DEBUG test - t3 state TERMINATED
17:52:31.556 [main] DEBUG test - t4 state TIMED_WAITING
17:52:31.556 [main] DEBUG test - t5 state WAITING
17:52:31.556 [main] DEBUG test - t6 state BLOCKED
线程相关方法
//提示调度器让出cpu,调度器可能会忽略不一定执行
public static native void yield();
//暂停线程正在执行的任务,当前线程还持有锁
public static native void sleep(long millis);
//中断此线程
//如果此线程处于被阻塞状态,例如调用sleep,wait,join方法,那么线程将立即退出被阻塞状态,并抛出一个InterruptedException异常
//如果线程处于正常活动状态,那么会将该线程的中断标志设置为 true,仅此而已。被设置中断标志的线程将继续正常运行,不受影响。
public void interrupt();
//等待直到当前线程结束
public final void join();
线程方法实践
sleep 线程休眠,但是持有锁
//可以防止cpu 100%
public static void main(String[] args) {
  new Thread(()->{
    while (true){
      try {
        Thread.sleep(50);
      } catch (InterruptedException e) {
        e.printStackTrace();
      }
      System.out.println("do something");
    }
  }).start();
}
interrupt 线程中断,线程是否中断应该由线程自己决定,所以为什么取消了stop、resume、suspend的方法
//用interrupt中断程序
public static void main(String[] args) throws InterruptedException {
  Thread t1 = new Thread(() -> {
    while (Thread.currentThread().isInterrupted()){
      try {
        System.out.println("t1开始sleep");
        Thread.sleep(100000000000L);
        System.out.println("t1结束sleep");
      } catch (InterruptedException e) {
        e.printStackTrace();
      }
    }
  }, "t1");
  t1.start();

  System.out.println("----main线程开始sleep");
  Thread.sleep(5000);
  System.out.println("----main线程结束sleep,当前他t1线程的状态"+ t1.getState());

  //准备打断
  System.out.println("Begin Interupt...");
  t1.interrupt();
  System.out.println("End Interupt...,当前中断状态为:"+t1.isInterrupted());
    }
join
//基于wait方法实现,稍后讲到,这里贴出一段源码,供参考
while (isAlive()) {
wait(0);
}
线程间通信
线程通信定义,线程通信就是当多个线程共同操作共享的资源时,互相告知自己的状态以避免资源争夺。
为什么需要
线程是操作系统调度的最小单位,有自己的栈空间,可以按照既定的代码逐步的执行,但是如果每个线程间都孤立的运行,那就会造资源浪费。所以在现实中,我们需要这些线程间可以按照指定的规则共同完成一件任务,所以这些线程之间就需要互相协调,这个过程被称为线程的通信
线程通信方式
线程通信方式主要有三种,有共享内存,消息传递和管道流,并且每种方式有不同的实现。
1. 共享内存
volatile有一个关键的特性,保证内存可见性,即多个线程访问内存中的同一个被volatile关键字修饰的变量时,当某一个线程修改完该变量后,需要先将这个最新修改的值写回到主内存,从而保证下一个读取该变量的线程取得的就是主内存中该数据的最新值,这样就保证线程之间的透明性,便于线程通信。
public class VolatileTest {

    private static volatile boolean flag=true;

    public static void main(String[] args) {
        new Thread(() ->{
            while(true){
                if(flag){
                    System.out.println("线程A");
                    flag = false;
                }
            }
        }, "A").start();

        new Thread(() ->{
            while(true){
                if(!flag){
                    System.out.println("线程B");
                    flag = true;
                }
            }
        }, "B").start();

    }
}
上面代码,结果是线程A和线程B交替执行
2. 忙等待
准备处理数据的线程B正在等待数据变为可用。换句话说,它在等待线程A的一个信号,这个信号使hasDataToProcess()返回true。线程B运行在一个循环里,以等待这个信号,这个方式会照成cpu100%的问题
protected MySignal sharedSignal = ...

...

while(!sharedSignal.hasDataToProcess()){
  //do nothing... busy waiting
}
3. 消息传递
wait/notify等待通知方式,从字面上理解,等待通知机制就是将处于等待状态的线程将由其它线程发出通知后重新获取CPU资源,继续执行之前没有执行完的任务,最经典的例子就是生产者-消费者模型
public class TwoThreadWaitNotify {

    private int start = 1;
    private boolean flag = false;
    public static void main(String[] args) {
        TwoThreadWaitNotify twoThread = new TwoThreadWaitNotify();
        Thread t1 = new Thread(new OuNum(twoThread));
        t1.setName("A");
        Thread t2 = new Thread(new JiNum(twoThread));
        t2.setName("B");
        t1.start();
        t2.start();
    }
    /**
     * 偶数线程
     */
    public static class OuNum implements Runnable {
        private TwoThreadWaitNotify number;
        public OuNum(TwoThreadWaitNotify number) {
            this.number = number;
        }
        @Override
        public void run() {
            while (number.start <= 100) {
                synchronized (TwoThreadWaitNotify.class) {
                    System.out.println("偶数线程抢到锁了");
                    if (number.flag) {
                        System.out.println(Thread.currentThread().getName() + "+-+偶数" + number.start);
                        number.start++;
                        number.flag = false;
                        TwoThreadWaitNotify.class.notify();
                    }else {
                        try {
                            TwoThreadWaitNotify.class.wait();
                        } catch (InterruptedException e) {
                            e.printStackTrace();
                        }
                    }
                }
            }
        }
    }
    /**
     * 奇数线程
     */
    public static class JiNum implements Runnable {
        private TwoThreadWaitNotify number;
        public JiNum(TwoThreadWaitNotify number) {
            this.number = number;
        }
        @Override
        public void run() {
            while (number.start <= 100) {
                synchronized (TwoThreadWaitNotify.class) {
                    System.out.println("奇数线程抢到锁了");
                    if (!number.flag) {
                        System.out.println(Thread.currentThread().getName() + "+-+奇数" + number.start);
                        number.start++;
                        number.flag = true;
                        TwoThreadWaitNotify.class.notify();
                    }else {
                        try {
                            TwoThreadWaitNotify.class.wait();
                        } catch (InterruptedException e) {
                            e.printStackTrace();
                        }
                    }
                }
            }
        }
    }
}
由于,底层存在虚假唤醒的问题,所以jdk推荐如下写法,规避虚假唤醒的风险:
synchronized (obj) {
  while (<condition does not hold>)
    obj.wait(timeout);
  ... // Perform action appropriate to condition
}